
INTERNATIONAL YOGA DAY June 21 — A Global Celebration of Mind, Body & Soul
June 23, 2026
पवनचक्की वर्किंग मॉडल: छात्रों के लिए एक संपूर्ण गाइड
June 29, 2026
Introduction: Why Build a Windmill Working Model?
A windmill working model is one of the most popular and exciting science projects for students across all grade levels. Whether you are preparing for a school science fair, a classroom assignment, or simply want to understand how renewable energy works, building a windmill model offers a hands-on, engaging way to learn about physics, engineering, and sustainability.
Windmills have been used by humans for thousands of years — from grinding grain in ancient Persia to pumping water across Dutch landscapes, and now generating clean electricity for millions of homes worldwide. By understanding the science behind a windmill, students gain insight into one of nature’s most powerful and freely available energy sources: wind.
In this comprehensive guide by Scholar Planet, we will walk you through everything you need to know about the windmill working model — its history, science, components, step-by-step construction, working principle, advantages, and real-world applications.
1. What Is a Windmill?
A windmill is a machine that converts the kinetic energy of wind into mechanical or electrical energy. The word “windmill” originally referred to mills that used wind power to grind grain into flour. Today, the modern version — known as a wind turbine — is used primarily for generating electricity.
Types of Windmills:
• Traditional Windmill: Used for mechanical tasks like grinding grain or pumping water.
• Modern Wind Turbine: Converts wind energy into electrical energy using a generator.
• Horizontal Axis Wind Turbine (HAWT): The most common type, with blades rotating on a horizontal axis.
• Vertical Axis Wind Turbine (VAWT): Blades rotate around a vertical axis; suitable for urban areas.
2. Brief History of Windmills
The history of windmills stretches back over 2,000 years, making them one of humanity’s oldest forms of mechanical technology.
• 7th Century AD: The earliest windmills were used in Persia (modern-day Iran) to grind grain and pump water. They had vertical sails made of woven reeds.
• 12th Century: Windmills appeared in Europe, particularly in England and France. These had horizontal axes and were used for milling grain.
• 15th–17th Century: The Dutch became famous for their advanced windmill designs, using them for land drainage, sawing wood, and making paper.
• 19th Century: American multi-bladed wind pumps were developed to pump water for farms and railways across the Great Plains.
• 20th Century to Present: Wind turbines were developed to generate electricity. Today, wind energy is one of the fastest-growing sources of renewable energy globally.
3. Science Behind a Windmill — How Does It Work?
Understanding the science of a windmill working model requires knowledge of a few core physics concepts:
3.1 Kinetic Energy of Wind
Wind is simply moving air. Moving air has kinetic energy — the energy of motion. The amount of kinetic energy depends on the mass of air and the speed at which it moves. The faster the wind, the more kinetic energy it carries. A windmill captures this kinetic energy through its blades.
3.2 Aerodynamics and Blade Design
The blades of a windmill are designed using the same aerodynamic principles as airplane wings. They are curved (airfoil shape) so that when wind flows over them, it creates a pressure difference — lower pressure on top and higher pressure on the bottom — which generates lift. This lift force causes the blades to rotate.
3.3 Rotation and Mechanical Energy
As the blades rotate, they turn a central shaft. This rotational (mechanical) energy can be used directly — for example, to turn a millstone for grinding grain — or it can be fed into a generator to produce electricity.
3.4 Generator and Electrical Energy
In a wind turbine, the rotating shaft is connected to a generator. The generator uses electromagnetic induction to convert mechanical energy into electrical energy. As the coil inside the generator rotates within a magnetic field, it produces an alternating current (AC) which can power homes and industries.
Energy Conversion Chain: Wind (Kinetic Energy) → Blade Rotation (Mechanical Energy) → Generator (Electrical Energy)
4. Key Components of a Windmill Working Model
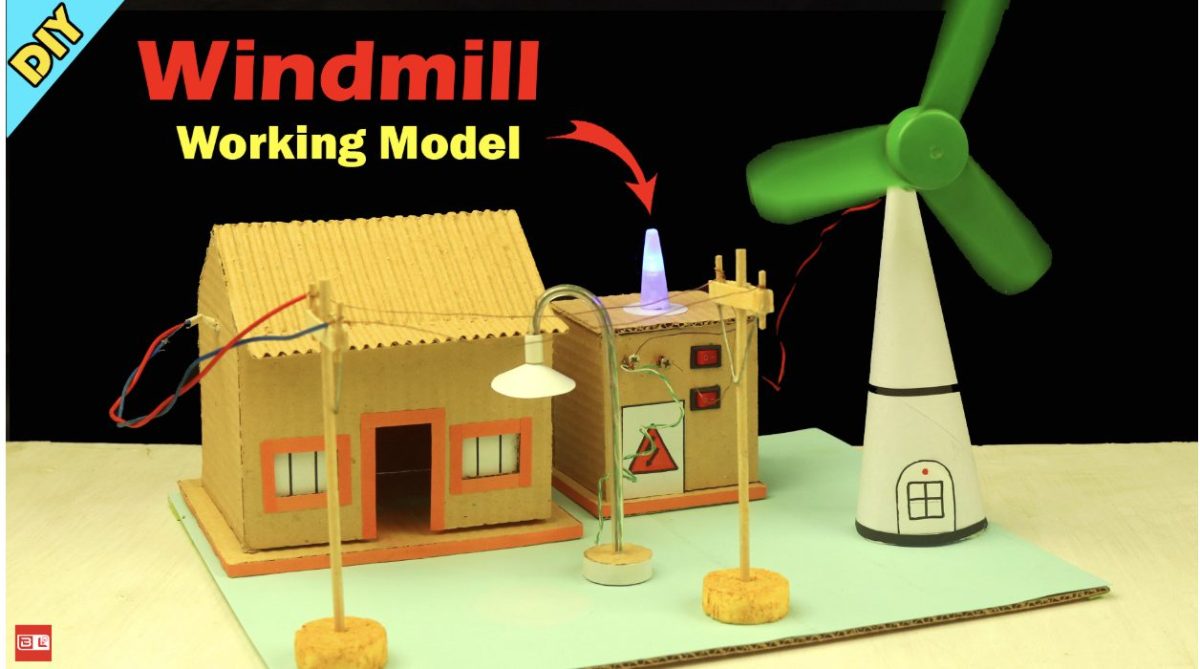
A typical windmill working model (especially for school projects) consists of the following components:
1. Blades (Sails/Rotor): The blades capture wind energy. Usually 3 or 4 blades are used, made of cardboard, foam board, or plastic sheets. Blade angle and shape affect efficiency.
2. Hub: The central piece that holds the blades together and connects them to the shaft.
3. Shaft (Axle): A rod or dowel that transfers rotational energy from the blades to the next component (generator or mechanical load).
4. Tower/Stand: Supports the entire structure and positions the rotor at the right height where wind speed is optimal.
5. Nacelle (for turbine models): A housing unit that contains the gearbox, generator, and controls. In student models, this can be a simple cardboard box.
6. Generator (optional for advanced models): A small DC motor used in reverse to generate electricity when the shaft rotates.
7. LED/Bulb (output indicator): Connected to the generator to demonstrate electricity production.
8. Base: Provides stability. Can be made from wood, cardboard, or a heavy block.
5. Materials Required for a Windmill Working Model
For a Basic Model:
• Cardboard or foam board (for blades and tower)
• Wooden skewer or pencil (as the shaft/axle)
• Plastic bottle cap or cork (as the hub)
• Scissors and craft knife
• Ruler and pencil
• Glue gun or strong adhesive
• A heavy base (wooden block or thick cardboard layers)
• Paint and decorating materials (optional)
For an Advanced Model (with electricity generation):
• All materials from the basic model
• Small DC motor (3–6V)
• Connecting wires
• Small LED bulb or mini fan
• Multimeter (to measure voltage)
• PVC pipe or thick straw (for the tower/nacelle)
• Tape and insulating material
6. Step-by-Step Guide to Making a Windmill Working Model
Follow these detailed steps to build your own windmill working model for school:
Step 1: Design Your Windmill
Sketch your windmill on paper before cutting anything. Decide on the number of blades (3 or 4 recommended), the size of the tower, and whether you want to generate electricity or simply demonstrate rotation. A 3-blade design is most efficient, mimicking real wind turbines.
Step 2: Create the Blades
Cut 3 identical blade shapes from your cardboard or foam board. Each blade should be roughly 15–20 cm long and 4–6 cm wide with a slight taper. Slightly twist or angle each blade at about 15–30 degrees. This angle (called the pitch angle) is crucial — it ensures the blade catches the wind efficiently. Color or paint the blades for a neat appearance.
Step 3: Make the Hub
Take a bottle cap or a small circular piece of cardboard. Make evenly spaced slots or holes around the edge to attach the blades. Ensure the hub has a central hole for the shaft/axle to pass through.
Step 4: Attach Blades to the Hub
Insert the base of each blade into the slots on the hub. Secure firmly with glue. Allow to dry completely. Check that all blades are evenly spaced (120 degrees apart for 3 blades, 90 degrees for 4 blades). Uneven blades will cause wobbling and reduced efficiency.
Step 5: Build the Tower
Cut a rectangular piece of cardboard and roll it into a cylindrical tower approximately 25–30 cm tall. Alternatively, use a PVC pipe or straw. Ensure it is sturdy enough to hold the rotor assembly. Glue or tape the tower securely to your base.
Step 6: Mount the Rotor Assembly
Push the wooden skewer (axle) through the hub. Make a small hole near the top of the tower. Insert the axle through the hole so the rotor (blades + hub) sits on one side of the tower top. The axle should rotate freely. You can use a straw section as a bearing to reduce friction.
Step 7 (Advanced): Connect the Generator
Attach a small DC motor to the axle on the side inside or behind the tower. Connect the motor terminals to your LED bulb using wires. When the blades rotate, the motor acts as a generator and lights up the LED. Secure all wiring neatly.
Step 8: Stabilise the Base
Place the tower on a heavy wooden block or thick cardboard base. Secure firmly. Ensure the entire model stands upright without tilting.
Step 9: Test Your Windmill
Hold your windmill in front of a fan or go near an open window with wind. The blades should begin to rotate smoothly. If the blades are not rotating, check the blade angle (pitch) — adjust to a steeper angle. Ensure the axle is not too tight. Check that blades are symmetrical.
Step 10: Label and Present
Label all parts of your windmill model clearly for your science exhibition. Prepare a short explanation of how it works, the materials used, and what the model demonstrates.
7. Working Principle Explained Simply
When wind blows against the angled blades of your windmill model, it exerts a force on them. Because the blades are curved and pitched at an angle, the wind pushes on one side more than the other, creating an imbalance. This imbalance causes the blades to rotate around the central axle. The rotation of the axle represents mechanical energy — the same principle used by windmills for thousands of years to grind grain or pump water.
In an advanced model with a motor attached, the spinning axle turns the motor’s coil within a magnetic field. This movement induces an electric current — which is Faraday’s Law of Electromagnetic Induction in action. The current flows through the circuit and lights up the LED, demonstrating the complete conversion of wind energy to electrical energy.
Key Physics Concepts Demonstrated: Kinetic energy, potential energy, torque, aerodynamics, electromagnetic induction, and the law of conservation of energy.
8. Factors Affecting Windmill Efficiency
Several factors influence how well your windmill model performs. Understanding these is crucial for improving your design and impressing judges at a science fair:
• Blade Shape and Size: Longer, well-shaped blades capture more wind energy. An aerodynamic, tapered shape works best.
• Blade Pitch (Angle): The angle at which blades are set relative to the wind direction is called the pitch angle. The optimal pitch angle is typically between 15–45 degrees depending on wind speed.
• Number of Blades: Fewer blades (2–3) rotate faster, while more blades (6+) provide more torque but at slower speeds. Modern wind turbines use 3 blades for the best balance.
• Wind Speed: The more wind, the more energy. Wind energy is proportional to the cube of the wind speed — doubling wind speed multiplies energy output by 8 times.
• Tower Height: Wind speed increases with height. Placing the rotor higher means access to stronger, steadier winds.
• Material Weight: Lightweight blades require less force to rotate and respond to even gentle breezes. Use lightweight foam or thin cardboard.
• Friction: Friction at the axle bearing slows rotation. Smooth, well-lubricated axle connections improve performance.
9. Advantages and Disadvantages of Windmills
Advantages
• Renewable and Inexhaustible: Wind is a free, unlimited natural resource.
• Clean Energy: No greenhouse gas emissions or air pollution during operation.
• Low Operating Costs: Once installed, running costs are minimal.
• Land Use: Wind farms can coexist with agricultural land — farmers can grow crops around turbines.
• Job Creation: The wind energy sector creates thousands of engineering and maintenance jobs.
• Energy Independence: Countries can reduce dependence on fossil fuel imports.
• Scalable: From small household turbines to massive offshore wind farms.
Disadvantages
• Intermittent Energy: Wind does not blow constantly — energy output is variable.
• Noise Pollution: Operating turbines produce a low-level noise, problematic near residential areas.
• Visual Impact: Large wind farms alter the landscape aesthetics.
• Bird and Bat Hazard: Rotating blades can harm wildlife if not properly sited.
• High Initial Cost: Installation of large turbines requires significant upfront investment.
• Location Dependent: Only viable in regions with consistent, strong winds.
10. Real-World Applications of Wind Energy
Wind energy is not just a science project concept — it powers real lives across the globe. Here are some major real-world applications:
• Electricity Generation: Large wind farms — both onshore and offshore — generate electricity for national grids. Countries like Denmark, Germany, China, the USA, and India are world leaders in wind energy production.
• Water Pumping: Mechanical windmills are still used in rural areas of Australia, Africa, and the American Midwest to pump groundwater for livestock and irrigation.
• Grain Grinding: Traditional windmills are still preserved and operational in the Netherlands, grinding grain into flour the old-fashioned way.
• Desalination: Wind energy is being used to power desalination plants that convert seawater into drinking water in coastal regions.
• Hydrogen Production: Surplus wind electricity can be used to produce green hydrogen through electrolysis — a key future clean fuel.
• Off-Grid Power: Small wind turbines provide electricity to remote communities, islands, and mountain stations not connected to the main grid.
• India’s Wind Energy: India has a total wind power installed capacity of over 44 GW (as of 2024), making it one of the top wind energy producers in the world, with major wind farms in Tamil Nadu, Gujarat, Rajasthan, and Maharashtra.
11. Tips to Make Your Windmill Model Stand Out at a Science Fair
• Add a voltmeter or multimeter to display the voltage generated — judges love live demonstrations.
• Use multiple LED colours to demonstrate how increasing wind speed generates more power.
• Prepare a comparison chart showing how different blade angles affect rotation speed.
• Create a poster showing the energy conversion steps: Wind → Mechanical → Electrical.
• Include real-world data: How many homes can a large wind turbine power? (Answer: A 2MW turbine can power approximately 400–600 average Indian homes.)
• Explain the environmental benefits of wind energy vs coal or diesel power.
• Label all parts clearly and be ready to explain each component’s function.
• Build two versions — one with 2 blades and one with 3 blades — and compare their efficiency.
12. Common Mistakes to Avoid
• Blades not angled correctly: Flat blades (0-degree pitch) will not rotate efficiently. Always angle your blades at 15–30 degrees.
• Too much friction at the axle: If the axle is too tight, the blades won’t spin. Ensure smooth rotation by using a straw as a bearing.
• Unequal blade sizes: Asymmetrical blades cause vibration and wobbling. Always cut blades to identical dimensions.
• Weak base: A top-heavy windmill with a weak base will tip over. Use a heavy wooden block or fill a cardboard box with sand.
• Thin blades that bend: Flimsy blades flex in the wind and lose efficiency. Use foam board or double-layered cardboard for rigidity.
• Poor electrical connections: If adding a generator, ensure wires are properly connected and insulated to avoid short circuits.
13. Frequently Asked Questions (FAQs)
Q1. Which class is the windmill working model suitable for?
A windmill working model is suitable for students from Class 4 to Class 12. Basic rotation models are great for primary classes, while electricity-generating turbine models are ideal for Classes 8–12.
Q2. How long does it take to build a windmill model?
A basic windmill working model can be built in 2–4 hours. An advanced model with a generator and lighting system may take 6–8 hours including drying time.
Q3. Can I use a plastic bottle to make windmill blades?
Yes! Plastic bottles are excellent for making lightweight, durable windmill blades. Cut the bottle lengthwise and shape the sections into aerodynamic blades.
Q4. What is the best motor to use for generating electricity?
A small DC motor rated at 3V–6V works best. Motors salvaged from old toys or purchased from electronics shops are ideal. Look for motors that generate voltage at low RPM.
Q5. How many blades should my windmill model have?
Three blades are recommended as they offer the best balance between efficiency and stability — exactly like real-world wind turbines. Two blades rotate faster but can be unstable.
Q6. What type of windmill is most efficient?
For electricity generation, the 3-blade Horizontal Axis Wind Turbine (HAWT) is most efficient. For self-starting in low winds, a Savonius or Darrieus vertical axis turbine works better.
Conclusion
Building a windmill working model is far more than just a school project — it is a journey into the world of renewable energy, physics, and engineering. As you craft each blade, test different pitch angles, and watch your LED light up from nothing but the breeze, you experience firsthand how humanity harnesses nature’s power.
Wind energy is one of the most important tools we have in the fight against climate change. By understanding and demonstrating how a windmill works, you are not just earning marks — you are contributing to a generation of young scientists and engineers who will shape a cleaner, greener future.
We hope this detailed guide from Scholar Planet has given you everything you need to build an outstanding windmill working model. Good luck with your project!
Explore more science project guides at Scholar Planet — gcapworld.com